Template Editor
The Template Editor lets you edit existing templates or create new ones if necessary. The grid displays the properties of all of the existing templates in your Support Engineering application.

Editing Templates
To edit an existing template, click in a property field and change the value. Certain fields are changed by typing a new value into the field such as the Template Name, Display Label. Other fields will have utilities which display to assist in selecting a value such as the template class field as shown below: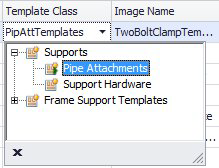
Use the utility to select a new class if necessary.
If you click in the Image Name field, the following flyout displays a list of resource images to select from for the specific template:

When you select a new image from the flyout, it will display in the Image Preview section of the Template Editor. If you have your own image file you want to use for the template, click the Add button to display a standard File Open dialog letting you navigate to the location of the file and open it.
The Build Method field must be edited manually and you must know the name of the Build Method to enter. To find a build method for enter here, you can click the Manage Scripts option to display the list of scripts which ship with the OpenPlant Support Engineering install.
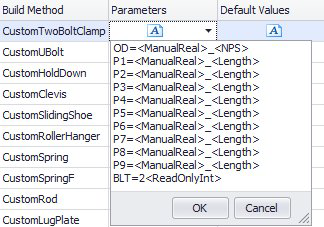
To add a parameter, place the cursor at the end of the last parameter line and click the Enter button to create a new line. Manually enter the parameter information and click OK. To remove a parameter, select it in the control and click Delete.
Once you have finished making changes to a template, click Save from the main tool ribbon to save the changes. If you wish to discard the changes, click the Refresh icon before saving the changes.